This blog is a journal of an artist's thoughts and endeavors, namely mine. I will frequently be writing about my art, my hand-crafted art cards in particular, but not always. I love nature, so I will also be talking about my yard and gardens, and the many birds that frequent my feeders. And sometimes I'll be sharing recipes and favorite shops and ......
Tuesday, September 25, 2012
Detour!
I had planned something altogether different for this post, and then my hubby cooked dinner and changed all my plans...
So it's fall. The weather here has gone from 90 on Monday, which is 15 degrees above average, to 65 today, Friday, which is 10 degrees below average. These huge temperature swings really muck with my equanimity. Ya know! Not to mention I have to dig through closets for warm clothes, when I was wearing tank tops and shorts a couple days ago! But I digress. Oops...
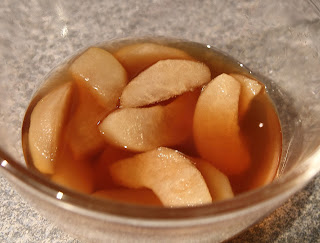
We have a neighbor with a Japanese pear-apple tree. And each year at this time, we are fortunate enough to get some of the fruit from their tree. And tonight my hubby came up with an Asian-inspired rendition of the traditional American sauteed apples sidedish. And it was really good!
So you slice up some Asian pear-apples, just like apples for a pie or tart. Then you toss them into a saute pan with some Ponzu Citrus Seasoning Sauce, Mirin Sweet Cooking Seasoning(sweet seasoned rice wine) and a bit of sugar. Let it all simmer for a bit and serve while the fruit is still crispy tender. And that's it folks!
Serve with a stir fry and rice, as a slightly sweet fall sidedish, borrowed from the west. And there you go. East meets west, just like my marriage!
But wait, I have an idea! Thicken the sauce with arrowroot. Toss it with the sliced pear apples to mix well, and then into a partially pre-baked buttery pie crust and bake for a bit...
Thursday, September 6, 2012
The Making of a Doll Bed
OK, so is this doll bed cute or what? It was a special birthday present for a special little girl's 5th birthday recently. We made it from a little 'Cuties orange' box, paint stirrer sticks, and leftover fabric. The only thing I bought was some acrylic paint in lavender, pink, and white. And I still have a ton of leftover paint! Now I wish I could take credit for this idea, but alas, the idea came from a Martha Stewart show. I'll post a link at the bottom of this article.
So the first thing I did was score a Cuties orange box from my bff who was on the lookout for one for me. She darn near tackled a produce guy for it! Then I had my hubby get me some paint stirrer sticks, which you can get for free from paint departments in those monster-sized home improvement stores. And then I had my hubby prime the box and paint stirrer sticks.
So far this project is working out ok for me, huh? I then glued a couple paint stirrer sticks to the primed base at the head and foot of the bed, using wood glue. This provides a good stable base for gluing the headboard and footboard to the bed. And since this part of the bed will never show, you don't have to worry about color here.
The only thing I would have done differently is to prime the bed frame white, since we ended up painting the it white in the end. Covering the gray primer took a few coats of acrylic paint! Oh, and I'd probably try using spray paint next time too. It would go much quicker I think.
And while I was coating these puppies with white paint, and waiting for the paint to dry, I started on a simple reversible quilt with matching pillow, and a dust ruffle. The girl's favorite colors are pink and purple, so pink and purple it was!
Now, since I had two different sizes of paint stirrer sticks, I chose to place the large ones in the four corners, and have them raised up high enough to make a canopy (And fyi, Martha didn't have a canopy!) for this deluxe doll bed. I chose to skip the whole mattress part, but Martha did make a nice covered mattress in her version. And all of the bedding is washable. You just pull it off the bed and throw it into the machine!
Then the little girl's mom thought some stencils in pink and purple would be really cute on the headboard and footboard. So I dug out my stencils for her, we taped the headboard and footboard together with painter's tape, I poured us each a glass of wine, and I said, "Go for it!" And she did. And it was very cute! Don't ya think?
Then we glued the headboard and footboard to the base of the bed with a lot of wood glue. I even put a heavy book on there while it was drying, just to make sure it never comes apart.
Then all I had to do was create a canopy that matched the dust ruffle. I narrow hemmed a rectangle, added eyelet trim to the edges, and ribbon ties at the corners to attach it to the bed posts.
And there you have it. A really cute doll bed which actually just barely fits a Barbie. And it really was a fun project to do with a friend, for her daughter's 5th birthday.
Subscribe to:
Comments (Atom)


