Thursday, October 31, 2013

A Kid's Mom (that is ... A Mom Kids Would Love To Have!)


The upcoming holidays have me in a blogging good spirit, so here we go! I have a few articles running around my brain for your reading amusement. But first, since it's Halloween  time, I have to tell you about a friend/ business associate of mine. A little background on her first....
 
She's a mom and divorced, something many of us can relate to. She also has her own online business, a new life with a man she loves, who had to move the family because of his job. Oh, and there's an ex in there too. And.... she is a walking/talking medical mystery, which makes her day to day life rather challenging.

Now check out what she did for her little girl's Halloween week school wardrobe! Is this one lucky child or what? These outfits are so totally cool! And mom actually spent the time to make these cute skirt and tops, which doesn't really surprise me, I must admit. This child is almost always dressed in something totally awesome, made by her mom.


Are these just the cutest pumpkin and candy corn outfits you've ever seen? I sure think so!  And these are just the warm up to the main event.....


Are you ready? I give you Snow White!


Is the a gorgeous costume or what? And totally handmade of course. I sew, and I used to make my boys Halloween costumes, many of which I've saved. But this Snow White costume really takes the cake from my point of view! Filmy netting, glittery sleeve insets.... All I can say is,"WOW!"

Now if you'd like to have a little of this talented mom's creativity for your special little girl, you're in luck! You can find Kim's fabulous, creative work at her online Etsy shop, The Joyful Princess Boutique at  www.thejoyfulprinces.etsy.com. Kim is always creating wonderfully creative girly items for her daughter, so please go check out her shop!






Wednesday, August 7, 2013

Remembering Mom Through Cards

 
When my Mom passed away earlier this year, I knew that eventually all of the handcrafted cards I'd made for her over the years would come back to me. So I thought I would share a few of them with you.
 
I can honestly say, that my techniques really have improved over the last few years. At least I think so! And I also have to say that watching craft technique webisodes on Paperwishes.com has been a big part of my learning process. If you haven't checked out any of these videos yet, they are simply wonderful. Just don't watch them late at night, or your creative brain will be flooded with so many ideas you won't be sleeping any time soon.... Just believe me on that one!


Black glitter glue really
does the trick here
on this old-timey card.


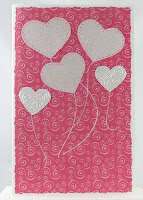
I like turning hearts
into ballooons


Mom was an avid quilter, so I simply had to do a Sunbonnet Sue card for her. The first quilt she ever made me was a Sunbonnet Sue pattern. I was 6 years old, and I still have it. The technique I used for the front of the card is called Iris Folding. Directions and templates are easy to find on internet, but I made my own template for this project. 


At one point in time I got heavily into paper quilling. I saw a pattern similar to this one in a book, I think, and had to try it out on a card.


And this fab paper is Color Me Resist paper available at Paperwishes.com. There are just scads of these papers available now, with the raised embossed portion in black, silver, gold, copper..... Big 12 x 12 inch sheets, card toppers, post cards... You can color on them with pastels, pencils, inks, paint.... This card was done with dye inks, carefully blending the colors. This whole line of Color Me Resist papers are just a ton of fun to play with! I was terrible at coloring as a child, so I'm going through that phase of my life as an adult!


Tuesday, July 30, 2013

Cute Chemo Caps

If you've ever spent any time hanging out with chemo patients, you know that they come up with a wide variety of head-covering options as they lose their hair and go bald. (As men have known for eons now, a bald head is a cold head in cool weather.) Lots of caps, but they all seem to scream 'winter hat being used to cover bald lady's head'! And scarves, they don't stay on bald heads too well. None of these options particularly thrilled me for my bff Margaret when her chemo treatments took out her hair!

Soooo, I set out on a mission to come up with some stylish hats that I could crochet for her. And the website www.ravelry.com was a perfect place to search. Many of their patterns are free. If you haven't been there and you love to knit or crochet, pop on over there when you get a chance.

First up were some wintery hats -  a Queen of Sheba Turban in tan, and a black cap, both with added flower embellishments at Margaret's request.


And then winter turned into spring, so I took a cloche pattern and turned it into a really cute white hat for warmer weather. No plain chemo caps here. No no no no no.... We rocked that chemo room with some really stylin' hats!


And as you can see, my dogs love their Margaret!


Friday, July 19, 2013

What To Do With All Those Fabulous Wine Bottles and Beer Bottles

It's been a while folks, hasn't it? I'm still digesting the fact that my Mom is gone, at least physically, but I'm coping now. I've done a lot of crocheting in the interim, but that is a post (or three or four) for another time.

Right now I want to tell you what I do with all those wine bottles with beautiful artistic labels, that I can't seem to throw out. Have you really looked at the artwork that goes into the labels of some wines? Some are clean and sophisticated, others have come from original drawings and paintings. And recently, even beer bottles have made it into my collection!

I do a variety of things with these labels, but today I'm gonna talk about home decor. For real! Smaller wine bottles make really nice bud vases for a single stemmed rose. Especially those sweet dessert wines. They usually come in small bottles with really nicely-done artistic labels. Perfect for a bud vase.


And the first beer bottle in my collection is right in the middle of two little wine bottles. And I think that beer bottle matches the clock pretty darn well! And as it happens, it was brewed right down I-5 in Eugene. Overcast Espresso Stout by Oakshire Brewing. YUM! Who says you can't mix wine and beer?

And now my nod to the USA's July 4th holiday. Red, white and blue, huh? How am I gonna pull that off? With cats and flags! For real!


Originally these cool cats held reisling. And they actually have a 4th litter mate, a black dude that comes out for Chinese New Year. I drank my way through all 4 bottles just to make sure I had the complete set! And then I added little flags with some sort of sticky putty stuff and some bows at the neckline, and they're ready for the dining room table, or anywhere else you want to catch people's eye.

Stay tuned to my blog for more frequent articles on a wider variety of crafty issues!

Monday, March 25, 2013

An Unconventional Valentine


At long last, here is that Valentine I promised everyone ages ago!


I decided to be unconventional this year, so I ditched the traditional red and pink colors. I have a pack of beautiful card stock by Martha Stewart called the 'essentials paper pad'; 42 sheets of spectacular pale blues and greens, accented with loads of white lacy patterns and hearts, and even some super shiny paper too. I look through this pack of papers and just drool!


I kept the design relatively simple because the papers are just sooooo pretty. First I punched the lacy edge of the paper, and then folded the card stock in half. I wanted to make sure that the lacy edge exactly met that back edge. So you cut first and fold second. The three hearts I cut out from a page so I could use them down the middle, vertically, overlapping, instead of the way they were printed, which was horizontally and not touching. Wrong direction! I then added a couple bows and put those sparkle dots in the middle just for a bit of added glitz. And we all know how much I love to use a bit of bling! Next came the birds, out of a shiny green paper, just for a bit more pizazz.


For the inside, I kept the heart theme going and used the same lacy background paper as well. And I added another bow with a sparkly dot being flown up into place by two more birds. The sentiment is simple, on purpose. "I love you!" really seemed to be enough. The overlapping heart stickers are beautifully embossed, and probably from the wedding section, if I recall correctly.
 
Unfortunately, my Mom never got to see this card. She passed away shortly before Valentine's Day. This is the hardest blog post I've ever had to do. Mom was a card crafter decades before it was even popular. And it is so hard to think that my days of crafting something beautiful for her are gone. Fortunately, I am surrounded by her beautiful artwork all over my house. And she will be close to me in my heart always....


Thursday, February 7, 2013

Birthday Card for Mom


My mom was 94 years old in late 2012. And her birthday always means a very special art card from me. Now my Mom is a very talented, creative, artistic person in her own right, and she was making handcrafted cards decades before it was even popular! And it is sharing our artistic talents that has made us so very close over my adult years.


My Mom loves muted colors, and I was in a mood to play with my new fern template from Paperwishes.  And then I just started rooting through nearly everything I have in my cardmaking arsenal. I can sit and look at papers and consider various combinations for hours and days! The paper I used for the ferns is actually a piece of cold-pressed water color paper. I wanted lots of texture. Then I started the inking process. First I did the the entire piece of paper in a pale, pale yellow-green. Then the ferns, beginning with the lightest greens, and gradually getting darker, until I got the look I wanted. And if I remember correctly, I used my Spectrum Noir pens to give them a soft look. If you've never played around with these alcohol pens, you should give them a try! The way the colors blend is almost magical.

Tearing this watercolor paper gives a nice aged-looking edge. To get this look, I tore the excess paper toward me, so a bit of the topmost layers were torn away with the excess. If you tear your paper the other way, you get a completely different look. Try it!


Then I just started layering papers and adding embellishments. The tag on the left, above, was made using the Layered Labels template by Hot Off The Press (available at Paperwishes). And I'm really loving this template, and using the heck out of it! This template has 9 different styles of labels. All you have to do is pick your style, pick your papers, trace and cut. Add some embellishments, and voila!  
 
And as my Mom would say, "There you have it."
 
Next week I will post the Valentine's Day card I just finshed for Mom. It's just a wee.... bit different than most Valentine's Day cards.
 
Happy crafting!