Tuesday, October 9, 2012

The Making of an Art Card - Part 3

There came a day when I just knew that the captain of my Etsy team, 'It's A Madcap Life', needed a little surprise lift via the postal elephant, as I like to call our US Postal Service. So I set my creative wheels in motion to make her an art card. And it wasn't long before I had a plan...

But first, a little background. A'esha, our beloved captain, has an Etsy shop (duh!) called The Madcap Heiress, where she sells jewelry inspired by iconic beautiful women, and fashion look books. She is a tour de force when it comes to dressing women fashionably. And when I have a fashion question, I throw it over to her.

So... my plan was to turn the card into a little shop called the Madcap Heiress.


Now obviously, the front of the card needed to be the outside of the shop.  So I dug through my templates until I found a template called Basic Wallpaper from www.fairytalecreations.com, that I use to create brick exteriors. And with a variety of brownish chalks and cotton balls, I chalked in the brick on the front of the card. Then, using their Chalk Talk 2 template, I created the front door, on a separate piece of cardstock, with yellow chalks. A sparkly dot for a door knob, a rose sticker above the door window and an open sign completed the front door.
 
Then it was on to the sign. For this I dug out a fabulous tag template called 15 Lovely Labels from Hot Off The Press, available at www.paperwishes.com . I love this template! I use it all the time to make wonderful layered tags and labels. And voila! A sign for the shop.
 
Then the inside. I knew I had these little paper packs of embellishments called Pretty by Artsy Collage. And I've looked at them enough over the years that I also knew that they had exactly the items I was looking for to put in this shop, beautiful Victorian era fashion items. So I carefully cut them all out.


Every single item inside the shop came from that pack, even the beautiful quote, and the decorative umbrella left by a customer outside the shop. I did add some aluminum foil to the picture frame to change it into a mirror. I even had the cork paper for the walls behind the shelves! And by angling the shelves, instead of cutting them in a rectanglular shape, the perspective is much better and looks much more realistic.
 
 
I must admit, I think this was the easiest and quickest art card I've ever made!  


Tuesday, September 25, 2012

Detour!


I had planned something altogether different for this post, and then my hubby cooked dinner and changed all my plans...

So it's fall. The weather here has gone from 90 on Monday, which is 15 degrees above average, to 65 today, Friday, which is 10 degrees below average. These huge temperature swings really muck with my equanimity. Ya know!  Not to mention I have to dig through closets for warm clothes, when I was wearing tank tops and shorts a couple days ago! But I digress. Oops...

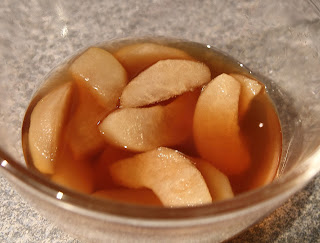
We have a neighbor with a Japanese pear-apple tree. And each year at this time, we are fortunate enough to get some of the fruit from their tree. And tonight my hubby came up with an Asian-inspired rendition of the traditional American sauteed apples sidedish.  And it was really good! 


So you slice up some Asian pear-apples, just like apples for a pie or tart. Then you toss them into a saute pan with some Ponzu Citrus Seasoning Sauce, Mirin Sweet Cooking Seasoning(sweet seasoned rice wine) and a bit of sugar. Let it all simmer for a bit and serve while the fruit is still crispy tender.  And that's it folks!

Serve with a stir fry and rice, as a slightly sweet fall sidedish, borrowed from the west. And there you go. East meets west, just like my marriage!

But wait, I have an idea! Thicken the sauce with arrowroot. Toss it with the sliced pear apples to mix well, and then into a partially pre-baked buttery pie crust and bake for a bit...


Thursday, September 6, 2012

The Making of a Doll Bed


OK, so is this doll bed cute or what? It was a special birthday present for a special little girl's 5th birthday recently. We made it from a little 'Cuties orange' box, paint stirrer sticks, and leftover fabric. The only thing I bought was some acrylic paint in lavender, pink, and white. And I still have a ton of leftover paint!  Now I wish I could take credit for this idea, but alas, the idea came from a Martha Stewart show.  I'll post a link at the bottom of this article.

So the first thing I did was score a Cuties orange box from my bff who was on the lookout for one for me. She darn near tackled a produce guy for it! Then I had my hubby get me some paint stirrer sticks, which you can get for free from paint departments in those monster-sized home improvement stores. And then I had my hubby prime the box and paint stirrer sticks.


So far this project is working out ok for me, huh? I then glued a couple paint stirrer sticks to the primed base at the head and foot of the bed, using wood glue. This provides a good stable base for gluing the headboard and footboard to the bed.  And since this part of the bed will never show, you don't have to worry about color here.

The only thing I would have done differently is to prime the bed frame white, since we ended up painting the it white in the end.  Covering the gray primer took a few coats of acrylic paint! Oh, and I'd probably try using spray paint next time too. It would go much quicker I think.


And while I was coating these puppies with white paint, and waiting for the paint to dry, I started on a simple reversible quilt with matching pillow, and a dust ruffle. The girl's favorite colors are pink and purple, so pink and purple it was!


Now, since I had two different sizes of paint stirrer sticks, I chose to place the large ones in the four corners, and have them raised up high enough to make a canopy (And fyi, Martha didn't have a canopy!) for this deluxe doll bed. I chose to skip the whole mattress part, but Martha did make a nice covered mattress in her version. And all of the bedding is washable. You just pull it off the bed and throw it into the machine!

Then the little girl's mom thought some stencils in pink and purple would be really cute on the headboard and footboard. So I dug out my stencils for her, we taped the headboard and footboard together with painter's tape, I poured us each a glass of wine, and I said, "Go for it!" And she did. And it was very cute!  Don't ya think?


Then we glued the headboard and footboard to the base of the bed with a lot of wood glue. I even put a heavy book on there while it was drying, just to make sure it never comes apart.


Then all I had to do was create a canopy that matched the dust ruffle. I narrow hemmed a rectangle, added eyelet trim to the edges, and ribbon ties at the corners to attach it to the bed posts.
 
 
And there you have it. A really cute doll bed which actually just barely fits a Barbie. And it really was a fun project to do with a friend, for her daughter's 5th birthday.


Monday, August 13, 2012

Belated Birthday

While enjoying a glass of wine (or two!) with a friend one afternoon, she exclaimed, "Oh shit! I forgot my mother's birthday yesterday... Do you mind if I give her a quick call?" I of course said I didn't mind at all.  And when she was done, I offered to make her a special Belated Birthday card, for a price!  And she took me up on it, so here is what I did.


First, I decided to make a tri-fold card this time. I haven't done one in a while, and I would just hate to be stuck in a creative rut!  To do this, I used this nifty template gizmo called a Top Score  multiboard by Crafter's Companion. This scoring board can be used to make all kinds of creative card shapes, and it comes with really good instructions too.  I bought mine online at Paper Wishes. Oh surprise!

I knew I was after a card in reds, because I asked my friend what her mother's favorite color is. She actually had to call her! So I started digging through my extraordinarily organized stash of papers (We have a small house and I have a large stash!), and I honed in on this stripey rose pattern and a solid red to match.

Then I followed the directions on the Top Score to create the shell of the card from a heavy white card stock. Next, red paper went on the front side.  On the back side in the middle, I cut out a piece of the stripey rose pattern for the top, because it shows, so I want that to be pretty too. But I don't want it all matchey matchey, if you know what I mean. And for underneath that I found a pretty little sticker of a perfume bottle in pink to pop onto the bottom.


Then it was on to the inside. First, a couple more cutouts from that stripey rose pattern. Then I picked out the sentiment, which we didn't want all gushy, so I kept it very basic. In cases like this, I really want the rest of the card to be very creative and artistic. In fact, I prefer it that way. It's just my style and personality. I like to express myself with my time and my artwork. And each artcard is unique, created especially for that particular person.

Various stickers and some border punching around the sentiment completed the card. And then, since I knew it wouldn't be mailed, I took a sheet of the stripey rose paper and made an envelope. I used another neat gizmo called The Enveloper, also by Crafter's Companion, and also available online at Paper Wishes.

And there you have it, another artcard. Next time I'm going to change direction. It's not going to be an artcard!

Saturday, July 7, 2012

Thursday, June 21, 2012

40th Birthday Card -Time To Have Some Fun!

While talking with a friend at our boys' lacrosse game this past season, she happened to mention that her brother was going to be forty soon. Now, I know her brother because he comes to a lot of the lacrosse games. And the two are very close, and delight in picking on and teasing each other.  So I jumped at the 40th birthday opportunity and offered to make a card. Time to play and have some fun!

So I decided the card had to be very masculine, he's a very big dude. And the card also had to be kind of on the mean side, just for fun! And this is how it began.


I used this great shiny black snakeskin paper for the background, and did the bell out a swirly silver paper. I used my Sakura glaze pens to do a gray outline on the bell and then decided to add the crack in there too, just like the Liberty Bell in Philadelphia, which is where I'm from originally.  I already had the phrase in mind, so I played around with fonts and sizing in my Broderbund Print Shop program, which I really use the heck out of.  The edges of the phrases were cut with deckle edge scissors and then I carefully inked the edges black. And I also grabbed a Sakura glaze pen in black and accented the first letter of both phrases. 

Then it was on to the inside.


I started with the black and silver papers that I used on the card front.  And then I decided to add the little pop up.  I used the same font as the front and accented the capital Ls with my favorite black Sakura glaze pen.  The 40! is a cardboard punch out that I glitter-glued with red Stickles.  I used a different font for the happy birthday tag, because I thought enough is enough on the old-style gothic font, and I inked the edges of the tag in red.

Then it occurred to me that some black balloons wafting up through the pop-up would be fun. So I found my balloon template and used plain black paper, then added red embroidery floss for the balloon strings.

And big sister had childhood photos that I was able to scan and print, to complete the card.  And I must admit, I had a lot of fun making this card!

Wednesday, June 6, 2012

A Tale of Two Cards

I recently had the opportunity to create two 'thinking of you' cards, so I decided to craft them at the same time, using the same group of papers. They are similar on the outside, but the insides were customized for the inidivual person receiving the card.

So I dug through my stash of papers, which continues to grow, and decided on soft colors.  I have so much paper and so many crafting tools now that I sometimes forget what I have!


The fancy tags on the front I made with my favorite new tag-making template (from www.paperwishes.com) that I got for Mother's Day from my #2 son.  I just love this template!  It has several different tags on it, all with different styles, all with those great layers built right in, which makes it super easy to create really pro-looking tags that perfectly match your project.  I'm just looking for ways to use this template these days, and there's another one now, which I don't have, yet....

At this point I sat and looked at the cards for a while, and decided that flowers were in order. So I dug through my paper stash again, this time my scrap stash, to find matching solid colors. And then I dug through my bin of punches to find my various different flower punches and little circle punches.  And I created the flowers, layering smaller flowers inside bigger ones, and punching out flowers around flowers on the paper, and adding itty bitty circles in the middle of some.  Then I played around with the flowers on the page until I was happy, and added a bit of lace down the left side.

Then on to the insides, which were very different.


For the insides I looked at my collection of sentiments and matching embellishments and I was lucky enough to find things that I liked and that matched my choice of papers. Oh yeah! I love it when I have exactly what I want! I then added the hearts, which I punched out myself from matching papers, and created the 'thinking of you' tags.  Deckle edge scissors and ink fancied up the edges of the papers for a more decorative look.  And then they were off, the old-fashioned way, via snail mail.


Tuesday, May 29, 2012

Birthday Card for my hubby

The cards I make for my husband each year are ones that I really sweat over!  I want them to be perfect because I know that he really treasures the time and creative energy that I put into them.  They frequently have an oriental theme, because he's Chinese.  And I really do love working with oriental papers and embellishments, and then combining them with more traditional papers and elements.  I'm very contemporary traditional!

So here is this year's birthday card. And it really does combine the oriental and traditional.  I went out on a limb with the metallic copper paper, because he is not a big fan of browns, but I love it, so I went with it.


I picked three background papers from 'the Natural Stack' by Die Cuts With a View (DCWV). I have quite a few different 'stacks' by DCWV because they make high quality papers and I just really love the papers they put out.  Then I added some copper sticker stripes along the borders of the papers so the transition from paper type to paper type didn't look so odd.  The copper stripes are kind of like those transitional strips between carpet and hard flooring in your house!  And all of these beautiful copper foil papers were really just a background for the tiger scene I got from the "Japanese Design" book and cd from DoverPictura. I printed out the tiger and then mounted it on the paper I used for the skinny stripe, which is very subdued. And for a little more bling, I added some orange crystals in the corners.


Then for the inside. I used two of the three background papers from the front as backgrounds for the bamboo, round grasses and sentiment.  The bamboo and round grasses were done with metal templates that I have.  For color I used a variety of green inks, starting with the lightest colors and ending with the darkest colors. 

The sentiments I found in my stash somewhere, but I didn't like the paper or font that had been used.  And I wanted to combine a couple sentiments.  So I went to my trusty Print Shop Pro program from Broderbund and created my own sentiment with exactly the fonts I wanted, the size and shape I wanted and on the paper I wanted.  And I must confess, I do this a lot.  I'm really starting to play around with mixing fonts, bolding certain words, and layering words over top of each other.  I use the heck out of that program!  And I do occasionally update to a newer version because I like it so much.  

Then it was time for a few last embellishments.  The copper hexagons I cut out one by one from background paper. Honest! The orange bamboo stickers I took out of my stash.  And just so folks would know, including my hubby, that bamboo is a sign of vitality, I included then little 'vitality' sticker too.


And voila! There you have it. 

Thursday, May 17, 2012

Lilac 'Miss Kim' Photos

These are three photos I took yesterday morning of our 'Miss Kim' Lilac. It is having its first really spectacular bloom since we planted it a few years ago. Which photo do you like best? Let me know! They will all be up for sale on my Etsy shop www.andreagoo.esty.com very soon.

Thursday, May 3, 2012

Happy Birthday - for a musical guy

OK, well I'm still on my Color Me Resist paper kick!  This time the card is for my oldest son, who will be 28 years old on May 2nd. And exactly how did he get so old?

My son eats, sleeps and breathes music, and he has since he was 4 years old.  So I chose to use a 12x12 inch sheet of the musical notes Color Me Resist paper.  I colored the whole sheet first, and then decided how to cut it up and use it.  I wanted an old world feel to the paper, so I chose golds, browns and a bit of green too, layering the ink colors over each other until I felt that it looked the way I wanted it to.  And since the paper has this wonderful flourish detail in the bottom right corner, I chose to use that part for the front of the card.  Then I colored a matching tag in greens, for a little contrast, and added a Happy Birthday vellum sticker from my stash.  Next I added a few rusty-colored dots with those Sakura Glaze Pens that I love so much, for a pop of color, and a matching dot-thing sticker-thing on the tag.  And this is how the front of the card looks now that it is completed.  The paper is so wonderful, I really felt like anything more would be too much.


Next it was on to the inside.  I started with another big chunk of the music notes paper on the right side.  Then I found some sentiments that I liked for a birthday card for a young musical guy, nothing too mushy!  And I added some music note stickers that I had in my stash. 


And I thought I was done!  So I showed it to my hubby who said, "What are you going to put on the other side?"  Everyone is so used to me covering the whole bloody card with artwork, I can't skimp anywhere anymore!  So I thought about it for awhile. I didn't want to detract from what I had already done. And then it hit me!  More music notes, cut out of the music notes paper. And then it was done....


Tuesday, April 3, 2012

Thinking of You

Inevitably there are occasions throughout the year when I find myself making cards for unexpected events.  Unfortunately, these are not usually happy events.  They are what I like to call 'Thinking of You' events.  I'm not one for mushy sentiments, just some good old creativity in the form of an art card and a simple thought.  I like to let my art do the speaking.

A friend of mine recently shared some disheartening news about her husband's health, and it was just the time for one of these cards. 


I started this project with another pattern of the Color Me Resist paper from Paper Wishes ; they have so many beautiful options now.  And since acquiring a whole lot of Spectrum Noir markers, also available from Paper Wishes , I was anxious to try them out on this paper and see if they were as magical as they seemed they might be.  They worked like a charm!  The markers blend so beautifully, and there are sets of colors in various shades and hues of the same color that really make blending a cinch!  You need to work with the Spectrum Noir markers while they are still wet, otherwise they don't blend the same way, which is why the outline of the leaves is a bit pronounced and unblended.  Of course, my friend didn't know that until now!

To finish off the front I added some simple ribbon stripes, the tag accented with dots of my favorite glaze markers and a bow.


On the inside I used peachy vellum, with more simple ribbon stripes.  I printed the tag from an art program of mine and used a Martha Stewart border punch to create its decorative edge, and a few more dots with my favorite glaze markers.  And by now you probably know that the butterfly is also a Martha Stewart punch accented with her glitter.  Good guess!

And voila!  Off in the mail it went.

Monday, March 26, 2012

The Making of an Art Card - Part2

I will now write this article for the second time!  The first one disappeared, except for the title.  Sooo, ya'll want to see how this card finished up and what techiniques and gizmos I used? Here we go!


The tag and butterflies were both made with Martha Stewart punches; her products are very high quality and I just love them.  The tag was made using one of her Punch Around the Page sets. You get two punches, one for the corner and one for the side. She tells you the measurements for various tag sizes that will work with this set, which makes it very easy to use.  I then inked the tag with colors to match and added the Happy Birthday vellum tag last.  The glitter on the butterflies is also Martha Stewart, along with her glitter glue, which has a pinpoint tip making precise application so easy.

Next the inside. What to do?


First I added the strip of Color Me Resist paper to match the front.  Then I sat and looked at it for a couple of weeks before I received the necessary inspiration to continue work!  I added the butterflies from a stencil I had.  I used oil pencils to color them because I really like the way you can blend their colors.  They are softer than graphite-based colored pencils.  In fact, I freeze them to sharpen them because they are so soft. (Doesn't everybody have colored pencils in their freezer?)  Then I looked at things some more.

The butterflies seemed lonely and needed something.... And then I found another stencil, with swirls and leaves, and I thought silver might be a good color. So I began the process of carefully inking them into the background areas, using sticky-notes and painter's tape to avoid inking over top of the butterflies.


Then for an inside sentiment.  I saw something similar in an art program I have, but I couldn't the change colors to suit myself.  So I made the tag from scratch, layering text boxes over top of each other to get the desired result. 

And voila! An art-style birthday card for my sister, who usually doesn't read my blog.  Her birthday isn't until later this month, so I'm kind of counting on that fact! 

Stay tuned for my next art card adventure.  It will be a 'thinking of you' style card.

Thursday, March 15, 2012

The Making of an Art Card - Part 1

I love playing with paper, and it's really all my friend Christy's fault. She is the one that had a paper stash and then showed me what you could do with all of those lovely bits of paper. And I was instantly addicted.

I had already been doing homemade photo Christmas cards, but this was a whole new world. It's kind of like creating a quilt, which my mom happens to be most excellent at doing. I layer techiques and colors and bits and pieces, and eventually the piece tells me it's done. It just looks complete all of a sudden.

Sooo, I am going to try and chronicle my art card escapades for you, as much as photographically possible.  Here is one I am working on right now.


The paper I used here is called Color Me Resist Paper and it is available at www.paperwishes.com.  Now this paper is really fun to work with.  The design is raised and resists all water-based inks. You can ink it and then you gently wipe any excess off the raised white part. You can color it with markers or pencils. And there are a multitude of other products out there I'd like to try, but I don't own them yet!

Here is what the paper looks like close-up as you get started.


And then I thought the front would need something more... And bless her soul, good old Martha Stewart has this fabulous butterfly punch that I have used and loved many times since I bought it. So I punched three butterflies out of heavy white paper and used Martha's glitter glue and glitter to jazz up the butterflies.
And here's the butterfly.


I'm working on the inside of the card now, and I will show you all how it finishes up, very soon. I have a deadline!

I also have more cards to show you, some complete, some still in process. Until then, happy crafting!

Tuesday, March 13, 2012

New at Art by Andrea

Decorative silver sliders with clear and jet black Swarovski crystal alternate with clear silver-lined seed beads and more clear Swarovski crystal beads. This is 'Swarovski Crystal and Seed Bead Bracelet 2'. This bracelet is sized for a larger wrist at 8 inches!                    

Purple Swarovski crystal in decorative silver sliders alternate with silver seed beads and two colors of purple Swarovski crystal beads. This is 'Swarovski Crystal and Seed Bead Bracelet 4'.           


Thursday, March 1, 2012

Contemporary Corned Beef and Cabbage

If just the title of this post sends shivers up and down your spine with the memory of cabbage cooking for eons stinking up the whole house..... well I'm not with you.  My mom never did this to us, thankfully.  But I've read the stories!


So here's how to do this meal in less time and not stink up the house!  First, slowly simmer the corned beef roast for about 2 hours, not three like the package probably says. Now if you can really slowly, slowly, slowly simmer the roast, you can go the full three hours, but it has to be a very slow, barely bubbling simmer.  Toward the end of the cooking time, add your potatoes.  I like to use Yukon gold if I can get them, otherwise red or white potatoes are the next best choice.  Russets are bakers and tend to fall apart, so I don't use them in this dish.

Note I have said nothing about cabbage yet. It's not time!  When the roast is done and resting, then you do the cabbage. 


I use a saute pan for the cabbage.  I put a couple of good spoonsful of the liquid from the roast into the pan, with just a tiny splash of soy, and heat that up.  When it's really hot, add your sliced cabbage and a bit of freshly cracked black pepper and saute it over fairly high heat until it is tender crisp.  And that's it for the cabbage.

Time to slice the corned beef roast and eat!


Friday, February 24, 2012

Time for Thai

I really wish I had a picture for ya'll, but I wasn't thinking about photography last night as I was whipping up another batch of Thai food for us. But next time..... I'll take some pics. I promise!

I start with Thai Kitchen red curry paste or green curry paste, and I follow the itty bitty directions on the label. I like both, so when I go to make Thai, I open both and give them each a good sniff and then decide what my taste buds want that night! 

You'll need a can of coconut milk (I use lite), some fish sauce, chicken stock, fresh basil (YES fresh!), bamboo shoots, a bit of brown sugar, some cooked meat like pork or chicken, and veggies. I usually add carrots, green beans and mushrooms, but potatoes, peas and onions are also good. And I love fresh basil, so I use a lot, finely chopped. And I usually have all of these items on hand.

Now a few words about how much of that curry paste to add. They say to use 1/2 to 1 tablespoon. Don't go there!!!! My hubby is Chinese and we both really enjoy spicey hot food. That much curry paste would launch him into orbit! Use 3/4 to 1 1/4 teaspoons of curry paste. If you can handle more than that, let me know!

I do add a ton of goodies, more than they say. And we always make a pot of rice as well.  Happy eating!

Thursday, February 23, 2012

New Czech pressed glass leaf earrings

Coming soon to my Etsy shop. These earrings are made from Czech pressed glass leaves in iris green. Their beautiful colors will brighten up your whole day!

Tuesday, February 21, 2012

A funny cat photo from the artist

I took this shot last night. I was taking the tag off the bag, so I could reuse the cute little zip lock baggie, and there was my Smokey kitty. He's a bit slow in some ways....

Monday, January 23, 2012

Swarovski here, Swarovski there!

After much struggle, and much ripping out and redoing, this piece had come to the point in the photo above. I hung it on Matilda, my dressmaker's form, and looked at it for days and days and days. I then decided that the clean edge was just too clean and needed .... something. So I added this edging.
Neither the edging nor the lacey necklace have been tied off and knotted yet. I know better than that! Eventually I will have to call it done, because it is headed for a competition in March.

Saturday, January 14, 2012

Art on the Cheap


When it's time to take down the Christmas decorations, the house always seems so blah and bland to me, especially with our long wet, gray winters here in the Pacific Northwest. So, I borrowed a theme from my Chinese hubby. When Christmas comes down, Chinese New Year decorations go up. Lots of red, black and gold come out. Years ago I bought a First Day of Issue stamp for Chinese New Year that was beautifully mounted and displayed, and it really needed some mates. Time for 'Design on a Dime'!

I quickly made the above two pictures to go with my other one. I already had the Chinese New Year stamps in the left pic. So I dug through my stash of art paper and found what I wanted to mount the stamps onto. A little bit of glue, some sparkle dots in the corner, and an inexpensive frame I already had (I buy frames on sale and just save them), and voila! Pic number one is done.


For the second pic, I dug through my really special papers from a bff who shares my 'paper passion' and I found the beautiful flying cranes on a gold background.  A little bit more paper for mounting, some red strips to frame the cranes, and sparkle dots in the corner, and pic number 2 is ready to pop into a frame.

And there you have it, easy art from my stash and no extra money spent!

Monday, January 9, 2012

Artist Trading Cards

For quite a while I was very active in an Artist Trading Card group, or ATCs as we called them. For those of you who are unfamiliar with this fun crafting adventuure, here is how it works. Person number 1 makes three identical backgrounds 2 1/2 x 3 1/2 inches in size, and puts a return address label on the back near the top. They then send these three cards to Person number 2, who does something identical to all three cards and then puts her return address label on the back. She then sends the three identical cards on to the third and final person. Person number 3 finishes the set of cards and puts her return address label on the back. She keeps one for herself and sends Person number 1 a copy and Person number 2 a copy.

It is always quite interesting to receive the completed cards (or homers as we call them)in the mail, because you just never know what another crafter will do to the set.


Take the above card for example. I received this set as Person number 3. The first person made the background and put on the eye. Person number 2 put on the puffy J. Then I had to figure out what the heck to do as Person number 3! So I put on the heart, the letter U, and did the writing after the J. Do you get it?